
Here are some ideas for fall. These are treat boxes called One Sheet Box made by scoring an 8.5x11 cardstock. (Tutorial for the box is at the bottom of this post). I added some stamped images from Red Rubber Designs Trick or Treat and Halloween Fun. All the images are colored with Copic markers. The background cardstock is Amelia patterned cardstock by RRD.

The first treat box is yellow cardstock. I used the cat image from Halloween Fun. The saying is from Trick or Treat. Added embellishments are a Spiral Clip, an office clamp, and ribbon.

Here's another image from Halloween Fun. I colored some white brads with Copic markers to get the desired color. It also has an office clamp for the closure and a ribbon. The saying is from Trick or Treat.

The last treat box is made with green cardstock and also has Amelia patterned cardstock. I distressed the edges of the cardstock and also the white cardstock on which the image is stamped. I added some Pointed Turn Mounts which I colored with Copic markers to match the box. the closure is a green Spiral Clip tied with a ribbon.
Would you like to know how I made these little boxes. Here is a quick tutorial to show you how to fold an 8.5x11 sheet of cardstock into a box.
 1. Place cardstock on scoring board (Scor-Pal, Martha Stewart, etc), aligned vertically to the left side of the board. Score at 2 1/2 and 6 inches.
 2. Turn cardstock horizontally on the board and score at 4 1/2 and 6 1/2 inches.
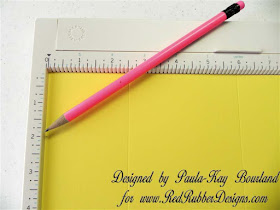 Using the ruler on the long side of the board, make a light pencil mark 2 inches from the corner. Repeat on all corners.
 Fold the score marks to the inside. Line up the first score intersection with a line on the scoring board. I used the 5 inch line. Unfold the cardstock. Make sure you keep the score intersection on the 5" groove and line up your 2" mark on the same groove. Score from the intersection to your mark to create a diagonal score. Repeat on all four sides.
 Fold all score lines and your box will look like the above.
Fold it together and clip it, and there you have a treat box ready to decorate. Be sure to unfold it to do any stamping or to add embellishments.

Challenges entered:
The Crafter's Blogger's Network - Anything Goes
Make it Monday - Anything Goes
Ooh La La Creations - Whiskers
Stamp with Fun - Favorite Stamps
Tammy's Scrappin Corner - Anything Goes
Truly Madly Crafty - Animals
Would you like to know how I made these little boxes. Here is a quick tutorial to show you how to fold an 8.5x11 sheet of cardstock into a box.


Fold it together and clip it, and there you have a treat box ready to decorate. Be sure to unfold it to do any stamping or to add embellishments.

Challenges entered:
The Crafter's Blogger's Network - Anything Goes
Make it Monday - Anything Goes
Ooh La La Creations - Whiskers
Stamp with Fun - Favorite Stamps
Tammy's Scrappin Corner - Anything Goes
Truly Madly Crafty - Animals
So cute! I love the tutorial for the treat box!
ReplyDeletePaula-Kay these are such terrific projects. I love your tutorial too! Saw this on MIM and so pleased that I popped across to take a closer look your colouring is beautiful and the layouts perfect for Halloween.
ReplyDeleteStamping Shanni
Wow , beaut boxes and great tutorial .
ReplyDeleteThanks for sharing on Make it Monday
How cool! This gives me an idea for a class! You come up with such GREAT stuff! Hugs!
ReplyDeleteOh, PK, these are too cute for words! Your coloring is perfection and the little boxes are just adorable. And an easy to follow tut...doesn't get much better than that!
ReplyDeleteAwesome treats boxes Paula Kay - so cute!
ReplyDeleteWhat a great idea and a lovely easy to follow tutorial. Your little cat is just right for our Whiskers challenge at Ooh La La creations Thanks for entering
ReplyDeleteAlli xx
What an absolutely great thing to know how to do! Thanks Paula Kay. I can see so many occasions these could be used!
ReplyDeleteWhat an adorable little bag! Love your decorating and tutorial! Thanks for sharing how to make this.
ReplyDeleteSpotted your project on MiM and so glad I decided to have a closer look! Your treat bags are just gorgeous :o)
ReplyDeleteWhat Adorable Treat Bags and a great tutorial. I just love them.
ReplyDeleteI am featuring you on our fan Facebook page the link is here.
https://www.facebook.com/TammysScrapinCorner
I am so pleased you
decided to join us for our Challenge.
Hugs, Founder and Owner of Tammy Scrapin Corner, Tammy Ortiz
Each of these is soooo cute! I love images and design.
ReplyDeleteI’m stopping by from MIM. (I’m entry #99)
~Cheryl~
**I am having a give-away on my blog. Feel free to stop by if you are interested.**
Absolutely in love with your project! Thanks for sharing!
ReplyDeleteI saw this on Make it Monday!
These are my entries: #77, #163, #183, and #258 and would love it if you could visit.
Hugs,
Julia
What fabulous treat bags I love them all and what a fab idea giving instructions
ReplyDeleteThank you so much for sharing with us at ooh la la this week
Wendi
What a beautiful bags !! I love it !Thanks for joining in our challenge.
ReplyDeleteHugs
Tina46
Stamp with Fun
Ooooooooh these are brilliant!!!
ReplyDeleteThanks for joining in over at TMC Challenge.
Hugs
Tracy
xoxox
These are so stinkin' cute! Great job and what a fun tutorial!
ReplyDelete